Get Connected to PioNet - WiFi and Internet at Lewis & Clark

Connecting with Wireless - Students, Employees, and Guests

In accordance with Lewis & Clark’s network access control policy, computers that connect to the network must have up-to-date antivirus and operating system software.

Connecting the first time can be complicated, especially if your computer is not up-to-date with the latest operating system patches and antivirus definitions. Call 503-768-7225 or stop by the IT Service Desk in the Watzek Library if you need assistance.

To get connected, please select your location from the list:

New for Fall 2021 in the Residence Halls, please connect to PioNet-Resident or PioNet-Guest.


PioNet-Resident

PioNet-Guest

iOS
  1. Go to Settings > WiFi
  2. Select the PioNet-Resident network
  3. Enter your LC credentials (do not include @lclark.edu)
  4. Trust the lc-clearpass-01.lclark.edu certificate
  5. You are now connected to the PioNet-Resident WiFi network
  1. From your device, select the WiFi network called “PioNet-Guest”
  2. You are now connected to PioNet-Guest
Android
  1. Go to Settings > Wireless & networks > WiFi settings
  2. Select PioNet-Resident from the list of available networks
  3. Enter your LC credentials (do not include @lclark.edu)
  4. CA certificate: Use system certificates
  5. Domain: lclark.edu
  6. Ensure the “Anonymous Identity” field is blank
  7. Select Connect
  8. You are now connected to the PioNet-Resident WiFi network
  1. From your device, select the WiFi network called “PioNet-Guest”
  2. You are now connected to PioNet-Guest
Android (Legacy)*
  1. Go to Settings > Wireless & networks > WiFi settings
  2. Select PioNet-Resident from the list of available networks
  3. For the CA certificate, choose “Do not validate”
  4. Enter your LC credentials (do not include @lclark.edu)
  5. You are now connected to the PioNet-Resident WiFi network

*https://www.xda-developers.com/android-11-break-enterprise-wifi-connection/

  1. From your device, select the WiFi network called “PioNet-Guest”
  2. You are now connected to PioNet-Guest
Windows 10
  1. Click the WiFi icon in the Taskbar
  2. Select PioNet-Resident from the list of networks
  3. Confirm that you want to connect by clicking on Connect
  4. Enter your LC credentials (do not include @lclark.edu)
  5. You are now connected to the PioNet-Resident WiFi network
  1. From your device, select the WiFi network called “PioNet-Guest”
  2. You are now connected to PioNet-Guest
macOS
  1. Click on the WiFi icon in the menu bar
  2. Select PioNet-Resident from the list of available networks
  3. Enter your LC credentials (do not include @lclark.edu)
  4. Continue if you get a certificate warning
  5. Enter your computer’s administrator password if prompted
  6. You may need to repeat these steps a few times
  7. You are now connected to the PioNet-Resident WiFi network
  1. From your device, select the WiFi network called “PioNet-Guest”
  2. you are now connected toPioNet-Guest
Ubuntu Linux
  1. Add a New Wi-Fi Connection:

    • Click on the “Add” button to create a new Wi-Fi connection
    • Enter the SSID PioNet-Resident
  2. Configure Security Settings:

    • Go to the “Wi-Fi Security” tab.
    • Set the “Security” to “WPA & WPA2 Enterprise”
    • Choose “PEAP” from the Security menu
    • Enter your identity (username) and password.
    • Click “Save” to apply the settings
  3. Connect to the Network:

    • Select PioNet from the network list and connect
  1. From your device, select the WiFi network called “PioNet-Guest”
  2. you are now connected toPioNet-Guest
When connected to PioNet-Guest and PioNet-Resident, your device will have access to the internet. If you require access to other internal LC resources, please use GlobalProtect.

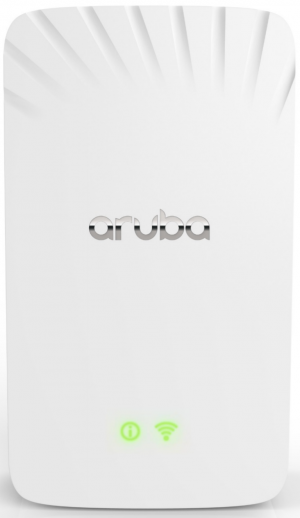
This is what the Wireless Access Point looks like in the Residence Hall rooms:

Aruba AP-505H wireless access point

Connecting with Ethernet in the Residence Halls

There is an ethernet port (wired) connection for every bed on campus. All you should need to do is plug in, and your computer gets all the information it needs from our network. Look for the wireless access point in your bedroom and you will find four ethernet ports on the bottom or the side. Only one WiFi box is available in any room with at least one bed. You may need to use a longer ethernet cord to accommodate your particular situation.

If you would like a longer complimentary ethernet cord, please contact us at the Service Desk

If you plug into the ethernet port and still can’t connect, please locate the following information:

  1. You have a Aruba wireless access device in your residence room, please provide the listed MAC address on the front or your building and room number and contact the Service Desk.

New for Spring 2022 at the Law campus, please connect to PioNet or PioNet-Guest.


PioNet

PioNet-Guest

iOS
  1. Go to Settings > WiFi
  2. Select the PioNet network
  3. Enter your LC credentials (do not include @lclark.edu)
  4. Trust the lc-clearpass-01.lclark.edu certificate
  5. You are now connected to the PioNet WiFi network
  1. From your device, select the WiFi network called “PioNet-Guest”
  2. You are now connected to PioNet-Guest
Android
  1. Go to Settings > Wireless & networks > WiFi settings
  2. Select PioNet from the list of available networks
  3. Enter your LC credentials (do not include @lclark.edu)
  4. CA certificate: Use system certificates
  5. Domain: lclark.edu
  6. Ensure the “Anonymous Identity” field is blank
  7. Select Connect
  8. You are now connected to the PioNet WiFi network
  1. From your device, select the WiFi network called “PioNet-Guest”
  2. You are now connected to PioNet-Guest
Android (Legacy)*
  1. Go to Settings > Wireless & networks > WiFi settings
  2. Select PioNet from the list of available networks
  3. For the CA certificate, choose “Do not validate”
  4. Enter your LC credentials (do not include @lclark.edu)
  5. You are now connected to the PioNet WiFi network

*https://www.xda-developers.com/android-11-break-enterprise-wifi-connection/

  1. From your device, select the WiFi network called “PioNet-Guest”
  2. You are now connected to PioNet-Guest
Windows 10
  1. Click the WiFi icon in the Taskbar
  2. Select PioNet from the list of networks
  3. Confirm that you want to connect by clicking on Connect
  4. Enter your LC credentials (do not include @lclark.edu)
  5. You are now connected to the PioNet WiFi network
  1. From your device, select the WiFi network called “PioNet-Guest”
  2. You are now connected to PioNet-Guest
macOS
  1. Click on the WiFi icon in the menu bar
  2. Select PioNet from the list of available networks
  3. Enter your LC credentials (do not include @lclark.edu)
  4. Continue if you get a certificate warning
  5. Enter your computer’s administrator password if prompted
  6. You may need to repeat these steps a few times
  7. You are now connected to the PioNet WiFi network
  1. From your device, select the WiFi network called “PioNet-Guest”
  2. you are now connected toPioNet-Guest
Ubuntu Linux
  1. Add a New Wi-Fi Connection:

    • Click on the “Add” button to create a new Wi-Fi connection
    • Enter the SSID PioNet
  2. Configure Security Settings:

    • Go to the “Wi-Fi Security” tab.
    • Set the “Security” to “WPA & WPA2 Enterprise”
    • Choose “PEAP” from the Security menu
    • Enter your identity (username) and password.
    • Click “Save” to apply the settings
  3. Connect to the Network:

    • Select PioNet from the network list and connect
  1. From your device, select the WiFi network called “PioNet-Guest”
  2. you are now connected toPioNet-Guest
When connected to PioNet-Guest and PioNet, your device will have access to the internet. If you require access to other internal LC resources, please use GlobalProtect.

New for Spring 2022 at the GSEC, please connect to PioNet or PioNet-Guest.


PioNet

PioNet-Guest

iOS
  1. Go to Settings > WiFi
  2. Select the PioNet network
  3. Enter your LC credentials (do not include @lclark.edu)
  4. Trust the lc-clearpass-01.lclark.edu certificate
  5. You are now connected to the PioNet WiFi network
  1. From your device, select the WiFi network called “PioNet-Guest”
  2. You are now connected to PioNet-Guest
Android
  1. Go to Settings > Wireless & networks > WiFi settings
  2. Select PioNet from the list of available networks
  3. Enter your LC credentials (do not include @lclark.edu)
  4. CA certificate: Use system certificates
  5. Domain: lclark.edu
  6. Ensure the “Anonymous Identity” field is blank
  7. Select Connect
  8. You are now connected to the PioNet WiFi network
  1. From your device, select the WiFi network called “PioNet-Guest”
  2. You are now connected to PioNet-Guest
Android (Legacy)*
  1. Go to Settings > Wireless & networks > WiFi settings
  2. Select PioNet from the list of available networks
  3. For the CA certificate, choose “Do not validate”
  4. Enter your LC credentials (do not include @lclark.edu)
  5. You are now connected to the PioNet WiFi network

*https://www.xda-developers.com/android-11-break-enterprise-wifi-connection/

  1. From your device, select the WiFi network called “PioNet-Guest”
  2. You are now connected to PioNet-Guest
Windows 10
  1. Click the WiFi icon in the Taskbar
  2. Select PioNet from the list of networks
  3. Confirm that you want to connect by clicking on Connect
  4. Enter your LC credentials (do not include @lclark.edu)
  5. You are now connected to the PioNet WiFi network
  1. From your device, select the WiFi network called “PioNet-Guest”
  2. You are now connected to PioNet-Guest
macOS
  1. Click on the WiFi icon in the menu bar
  2. Select PioNet from the list of available networks
  3. Enter your LC credentials (do not include @lclark.edu)
  4. Continue if you get a certificate warning
  5. Enter your computer’s administrator password if prompted
  6. You may need to repeat these steps a few times
  7. You are now connected to the PioNet WiFi network
  1. From your device, select the WiFi network called “PioNet-Guest”
  2. you are now connected toPioNet-Guest
Ubuntu Linux
  1. Add a New Wi-Fi Connection:

    • Click on the “Add” button to create a new Wi-Fi connection
    • Enter the SSID PioNet
  2. Configure Security Settings:

    • Go to the “Wi-Fi Security” tab.
    • Set the “Security” to “WPA & WPA2 Enterprise”
    • Choose “PEAP” from the Security menu
    • Enter your identity (username) and password.
    • Click “Save” to apply the settings
  3. Connect to the Network:

    • Select PioNet from the network list and connect
  1. From your device, select the WiFi network called “PioNet-Guest”
  2. you are now connected toPioNet-Guest
When connected to PioNet-Guest and PioNet, your device will have access to the internet. If you require access to other internal LC resources, please use GlobalProtect.

New for Spring 2022 at the College of Arts and Sciences, please connect to PioNet or PioNet-Guest.


PioNet

PioNet-Guest

iOS
  1. Go to Settings > WiFi
  2. Select the PioNet network
  3. Enter your LC credentials (do not include @lclark.edu)
  4. Trust the lc-clearpass-01.lclark.edu certificate
  5. You are now connected to the PioNet WiFi network
  1. From your device, select the WiFi network called “PioNet-Guest”
  2. You are now connected to PioNet-Guest
Android
  1. Go to Settings > Wireless & networks > WiFi settings
  2. Select PioNet from the list of available networks
  3. Enter your LC credentials (do not include @lclark.edu)
  4. CA certificate: Use system certificates
  5. Domain: lclark.edu
  6. Ensure the “Anonymous Identity” field is blank
  7. Select Connect
  8. You are now connected to the PioNet WiFi network
  1. From your device, select the WiFi network called “PioNet-Guest”
  2. You are now connected to PioNet-Guest
Android (Legacy)*
  1. Go to Settings > Wireless & networks > WiFi settings
  2. Select PioNet from the list of available networks
  3. For the CA certificate, choose “Do not validate”
  4. Enter your LC credentials (do not include @lclark.edu)
  5. You are now connected to the PioNet WiFi network

*https://www.xda-developers.com/android-11-break-enterprise-wifi-connection/

  1. From your device, select the WiFi network called “PioNet-Guest”
  2. You are now connected to PioNet-Guest
Windows 10
  1. Click the WiFi icon in the Taskbar
  2. Select PioNet from the list of networks
  3. Confirm that you want to connect by clicking on Connect
  4. Enter your LC credentials (do not include @lclark.edu)
  5. You are now connected to the PioNet WiFi network
  1. From your device, select the WiFi network called “PioNet-Guest”
  2. You are now connected to PioNet-Guest
macOS
  1. Click on the WiFi icon in the menu bar
  2. Select PioNet from the list of available networks
  3. Enter your LC credentials (do not include @lclark.edu)
  4. Continue if you get a certificate warning
  5. Enter your computer’s administrator password if prompted
  6. You may need to repeat these steps a few times
  7. You are now connected to the PioNet WiFi network
  1. From your device, select the WiFi network called “PioNet-Guest”
  2. you are now connected toPioNet-Guest
Ubuntu Linux
  1. Add a New Wi-Fi Connection:

    • Click on the “Add” button to create a new Wi-Fi connection
    • Enter the SSID PioNet
  2. Configure Security Settings:

    • Go to the “Wi-Fi Security” tab.
    • Set the “Security” to “WPA & WPA2 Enterprise”
    • Choose “PEAP” from the Security menu
    • Enter your identity (username) and password.
    • Click “Save” to apply the settings
  3. Connect to the Network:

    • Select PioNet from the network list and connect
  1. From your device, select the WiFi network called “PioNet-Guest”
  2. you are now connected toPioNet-Guest
When connected to PioNet-Guest and PioNet, your device will have access to the internet. If you require access to other internal LC resources, please use GlobalProtect.


Connecting your Smart TV or Smart Speaker

Connect to the guest wireless network, PioNet-Guest, or an Ethernet port to connect to the Internet. Devices that have older wireless technology, such as 802.11b, will not work on the network.  If your device cannot connect via wireless, you will need to connect it using the wired Ethernet network.

If your “smart” device cannot connect to an open or WPA2-Enterprise SSID, then it is not supported on the network at this time. We hope to add this feature in the future.

Issues with Multiplayer Gaming in the Residence Halls

If you are having trouble connecting with multiplayer gaming (your device may inform you the NAT type isn’t compatible), you will need to connect your device to an ethernet port on the Aruba device located in your room.

Connecting with VPN

If you are off-campus and need access to on campus network resources, please use our VPN solution.  

If you are connected to our public wireless network, LC Wireless or PioNet-Guest, or PioNet-Resident you must use VPN for full network access to services like printing, file servers, etc.

HELP! I can’t connect!!!

If you cannot connect, have a bad connection, or are having issues with the wireless network please report the problem.  For assistance during business hours, we recommend you call or visit the appropriate Service Desk for your campus.